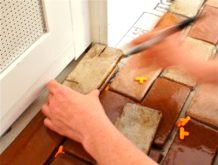
Now that we have laid our tile and it has set for 24 hours, we are ready to grout. This is the best part, because you can really see how your work turned out.
Materials:
- Grout (I’ll give a little more detail on choosing a grout in the post)
- Bucket of water
- Sponge
- Viva Paper towels
- Grout Float
- Trowel
- Rubber gloves
I always buy pre-mixed grout, it’s more expensive than mixing it yourself but a worth every penny in the time/mess saving. We were trying to get the look of brick though, so this time we used sanded grout that we mixed in a bucket. They sell mixing tools that can be attached to a drill, but those make more of a mess than putting a little muscle into it and mixing by hand. Did I say a little muscle? I mean a lot of muscle. Luckily my strong husband took over halfway through, because I couldn’t do it on my own.
Sanded grout looks more professional and I prefer to use it when I’m laying a thick grout line, like the 1/4” we used here. I typically do a 1/16” grout line for backsplashes and 1/8 for flooring, where I can get away with a pre-mixed unsanded grout. Choosing a grout color close to the color of the tile keeps any uneven lines from my amateur tile job from standing out. I think staggered tile looks more professional than laying it in a grid (there are all kinds of awesome patterns, basketweave, herringbone, but that’s beyond my skill-level).
To do this you use T-Spacers instead of the X-spacers. Home Depot never has T-Spacers, though, so I’ve been using scissors to cut one piece off of my leftover x-shaped spacers.
First I wipe down my tiles with a damp sponge and then use a trowel to dump a softball sized hunk of grout onto my tiles, we won’t say what this looks like.
I typically work in 2” square sections. Keeping things moist helps this process go smoothly, so I always dip my grout float in my bucket of water before spreading. All the tutorials say to spread at a 45 degree angle, but I usually just push at the grout from every direction until everything is full.
Then I pull my sponge from the bucket and squeeze as much water as I can from it. I wipe in a circular motion and push down gently on all my grout lines to pack it in.
I keep rubbing in a circular motion until it looks clean, rinsing my sponge as it gets muddy with grout, and replacing the water in my bucket when it gets too thick to see through. Here’s a photo run down:
After everything has dried for a couple hours I wipe the grout haze off. It’s important to give yourself enough time when tiling, because if you don’t wipe the haze off in that window it can be VERY hard to get. If you look on the internet people generally say to use cheesecloth, I find Viva paper towels work just as well. I like Viva because they’re the softest paper towels you can buy and prevent the sand from scratching the tile, plus I never remember to buy cheesecloth. I rub in a circular motion, polishing the individual tiles until they’re shiny.
And thats about it. Grout s kind of like cement, so gloves are a must to keep your hands from feeling like….uhh…cement.
I definitely think we got the look we were going for. Grant likes it, too!


