I make a lot of DIY artwork. Most of it I see somewhere else and make my own version to save money, like the Hippies sign in our front hall:

Or the Brush Your Teeth sign in Grant’s bathroom:

Both of these projects were made when I was using Photoshop, which is a beast. If you’ve spent much time on my site, you’ve seen me plodding along and (hopefully) improving with my web design, but I’m the first to admit I’m not an expert with the computer stuff. Photoshop is amazing if you have the skills, but for someone like me, who has no problem laying floors but bursts into tears when trying to figure out how to embed the code for a multi-tabbed sidebar widget, Photoshop is a nightmare.
Recently I bought a one year subscription to PicMonkey. It’s not the end-all solution to photo editing, but it replaces Photoshop for most of my needs. I still have to edit first in IPhoto before exporting to PicMonkey, where I add watermarks and make collages. I think you can get a 30 day subscription for $4.95, which is a nice way to try it out. It’s great for artwork though, because it has almost all the features I need from Photoshop in a very user friendly package.
This is going to be an image heavy post, so I’m breaking it up into a few parts to keep the page load time bearable. This first post is the starting point for any artwork you want to make in PicMonkey.
Here’s the how to:
First, I print at Costco, they’re print center is AMAZING and super cheap. So, I customize my artwork sizing for their mounted poster print options. On PicMonkey you have to set your print size by pixels, here’s a breakdown:
- 11 x 14″ – 1260 x 990 pixels
- 16 x 20″-1800 x 1440 pixels
- 20 x 30″-2700 x 1800 pixels
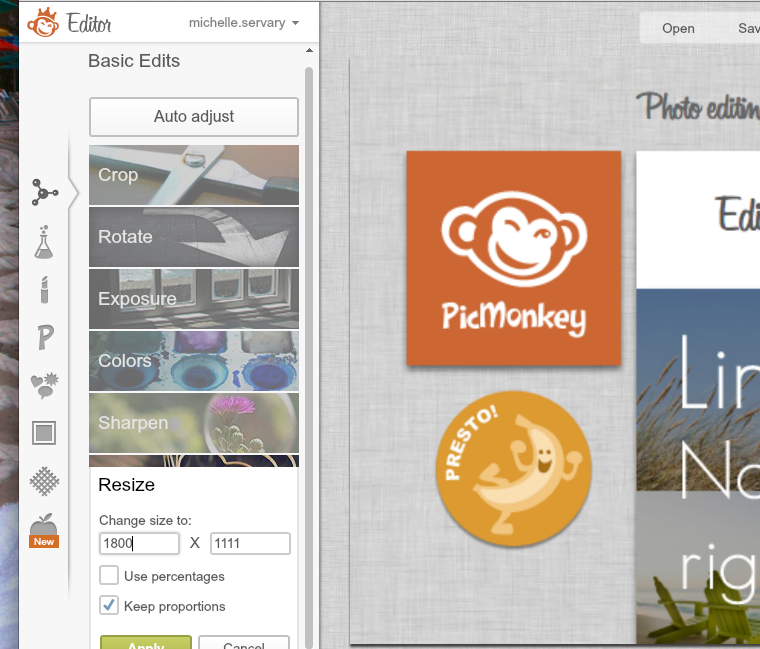
Login to PicMonkey.com and choose “Edit a Photo”

Then upload a picture, any picture at all. We will be whitewashing and resizing it.
Once your photo is uploaded, go to the sidebar on the left choose the box on the bottom that says “Resize”, then unselect the “keep proportions” box and change your size to the print you want, I made mine 1800 x 1440 pixels.
Now you want to go to the Overlays section in the left sidebar (it’s the button that looks like a heart, spiky star thing, and a thought bubble) and choose geometric:

When the drop box comes down, choose the first black rectangle:

A rectangle will then pop up over your photo. 

Drag the corners out to cover your entire photo.

Then use the “overlay” box on the left to change your background color by dragging the black dot around in the rainbow-like box until you get the color you want. I made mine white. Now you want to combine the layers by clicking on the “combine” icon up top, it’s the second button from the end at the top of your screen. It looks like to sheets of paper stacked on top of one another with a down arrow on the right of them:

This is what your screen should look like now:

Ok, I hope that made sense. Once we get a blank canvas the fun can begin! Look for part II tomorrow. Tonight is date night. We are taking a night tour of the DC monuments, something I’ve been wanting to do forever, so hopefully I’ll have some great pictures to share.
Tags : Crafts, DIY artwork, picmonkey
