As of last week, my friend Colleen had never picked up a paint brush in her entire life, so when she said she wanted to paint her kitchen cabinets my jaw dropped. This would be my fifth set of cabinets and I can’t even begin to count what number of painting projects in general, so seeing the process through the eyes of a beginner was a great experience. I’ve used several different methods to paint cabinets, so at this point I feel like I have it down to a science.


Materials
1. Benjamin Moore Satin Aura Paint-Ben Moore Aura dries very quickly, so you can recoat in one hour. It is self leveling and self-priming, creating a very smooth finish. It hardens to an enamel like coating, so they clean up very easily, I know because my cabinets are constantly covered in tiny peanut butter fingerprints. Any other paint would require a semi-gloss or high gloss finish on cabinets (as well as a primer), with the Aura you can use a satin finish so any imperfections in your painting will be less visible.
2. Zibra PB100LZS 1″ Square Paint Brush-$7.99 on Amazon Prime
3. Tarps
4. Baby Wipes-At first Scott and Colleen were really nervous about any paint that got on their floor, but they quickly realized when painting on hardwoods or tile, it just wipes right off. You may have to gently scratch at it with your fingernail if it dries, but don’t freak out if you get a couple drops on the floor.
5. Sanding Blocks
6. Scrubbing brush (the kind you use for dishes)
7. Dish soap
8. Drill (to remove your doors from the frame)
Colleen found choosing a paint color to be intimidating (1000 shades of white can be overwhelming). I told her I like to use white because it goes with everything. I love color, but my whole house is white because I’ve painted rooms crazy colors before and felt stuck whenever I wanted to buy a new table cloth or picture for the wall, so I like to use my accessories to add color to a room. She ended up going with White Dove because it’s Benjamin Moore’s #1 selling paint color. Houzz.com is a really helpful web-site when choosing paint colors. Just type in “White Dove” (or any other paint color you’re considering) in their search bar and usually you will find a ton of photos of things that have been done in that shade. Seeing colors on someone else’s wall always helps me make a decision. Aura goes a long way, we only needed a half gallon to paint their entire kitchen.
We used the drill to remove all the cabinets from their frames. I like to lay my cabinets out on the floor and paint the fronts, let them dry, then hang them back up to paint the backs and leave them open for a day. This way I don’t roll my doors over too early and risk messing up my paint job. I have to navigate around the cabinet hardware doing it this way, but if I make a mistake it’s the back of the door.
Using a pot scrubbing brush and dish soap we cleaned the grease and grime off of the cabinets and frames. Usually the cabinets around the stove will be the worst, so I’m very thorough on these.
Then we used a sanding block. You don’t have to go crazy here, just make sure you run over every part of the door to get anything that may be sticking. Colleen’s cabinet frames were laminate, so I sanded a little more vigorously to roughen them up. Laminate can still be painted, the surface just needs to be scratched to give the paint something to stick to.
I like to paint my cabinets in sections to minimize the disorder in my house. Usually I will lay a tarp on my dining table and paint as many as I can fit each day until it’s done. Scott was not about to have his kitchen in the living room for a week, though, so we did everything at once. If I have to work on the floor I try to get my tarps in the center of the room and leave at least two feet of space between rows of doors. If one side of the tarp is against the wall it can be difficult to reach.

Scott and Colleen both preferred the Zibra brush to the other brush I brought, it is great for edges as well as getting in the grooves of the door. I dip the very tip of the brush into my paint, about 1/8 of an inch. Sorry for the severe editing below, hopefully you can make out how much paint is on the brush:

I don’t use any kind of tape when I paint, this brush allows me to paint right against the floor and as long as there isn’t too much paint on the brush, it will create a perfect edge. The paint will build up on the brush as you paint, so when my brush gets stiff or the edges aren’t looking as clean as they were when I first started painting, I rinse my brushes in the sink until the water runs clear and dry it with a rag.
Self-leveling means the paint is very thin, so it continues to…ooze? I guess that’s a good word. It also dries really fast, these two things combined can add up to trouble. Paint a very thin coat (it won’t look very impressive after one coat-Colleen was freaking out thinking she’d made a bad decision until the second coat went on) and look all over the door for drips before moving onto the next door. If I see any drips I fix them right away and check to make sure the paint hasn’t pooled in the grooves of the cabinet. Once you move to another door you do not want to try to fix anything on a previous door, or the paint will gum up. If you find some drips later, lightly sand them off before recoating.
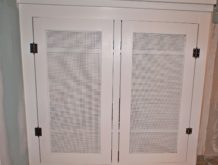
It took us about two hours to paint everything, and because the Aura can be recoated in one hour we immediately went back to our starting point and began the second coat. The recoat time can be influenced by weather conditions. The second coat should look thick and smooth. If you paint a stroke and it appears thick on the sides with a thin appearance in the center, this means the first coat is gumming up as you paint and it needs to dry a little longer. If that didn’t make sense, it will if it happens to you. The door on the right has a second coat, see the difference?

Everything dried overnight, and the next day Scott hung the doors back up. Darker cabinet doors can need a third “spot coat”, which can be applied when the doors are hanging. Colleen went around the next day and touched up any areas where the paint looked thin. At long last, this is the after:


Not bad for one day of painting! It really brightened up their kitchen and made their countertops pop. Paint can continue to cure (painter talk for harden) for up to a month, so I try not to bang any pots and pans into the doors during this time. If that does happen and it chips (I’ve actually never had this paint chip, I swear, not a single time) I would lightly sand it and paint two more coats on that spot. Honestly, I can’t imagine anyone being harder on their cabinets than we are. My son’s favorite play-zone is the kitchen, he loves to open the doors and pull the pans out and throw them around the kitchen. If my cabinets haven’t chipped, I doubt anyone else’s will.